Search This Blog

Showing posts with label Pranayama. Show all posts

13 August, 2011

Bhramari Pranayama or Humming bee Breath


Introduction

The word "Bhramari" comes from the sanskrit name bhramar which is Humming black bee. The practice of bhramari breathing calms the mind, reduces the stress or fight - flight response. It reduces cerebral tensions, anger, anxiety, insomnia, The blood pressure is also lowered. This pranayama is very effective in speeding up the healing of body tissues and may be practiced after surgeries.

The purpose of the Bhramari breathing is to reduce throat ailments. This may have positive effect on the endocrine glands specially thyroids and nervous system. In ancient text of Hatha Yoga Pradipika, Swami Swatmaram says that person becomes Lord of Yogis and mind gets absorbed in the supreme bliss. It has a calming effect on entire nervous system, especially it stimulates the parasympathetic nervous system, which induces muscular relaxation and is very effective in stress management. So this pranayama is very effective for relaxation of body and mind.

In this pranayama one needs to create a sound while exhaling and inhaling in the throat. The sound is similar to chanting of Om, especially the long mmm.. in Omkar. The sound should be deep, steady and smooth

Technique

Stage 1: Preparation

Sit in a comfortable meditation asana. The spinal cord should be erect, the head straight and the hands resting on the knees in chin or jnana mudra.

The ideal posture for this practice is padmasana or siddha / siddha yoni asana.

The position of nadanusandhana asana, which is used in nada yoga, may also be utilized as follows.

Stage 2: Body Posture

Sit on a rolled blanket with the heels drawn up to the buttocks. Place the feet flat on the floor with knees raised and the elbows resting on the knees.

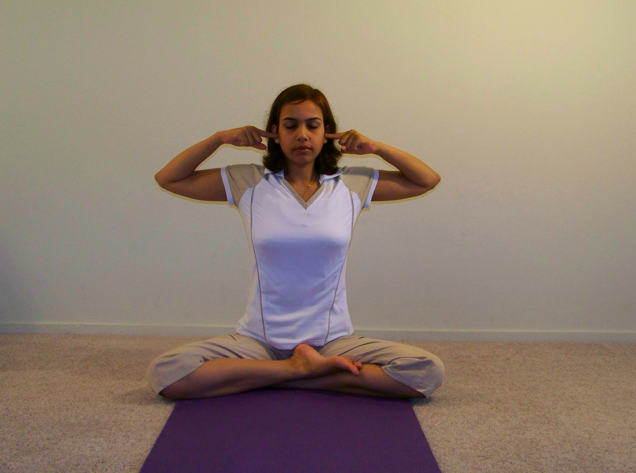
Close the eyes and relax the whole body for a short time. The lips should remain gently closed with the teeth slightly separated throughout the practice. This allows the sound vibration to be heard and felt more distinctly in the brain. Make sure the jaws are relaxed.

Raise the arms sideways and bend the elbows, bringing the hands to the ears. Use the index or middle finger to plug the ears. The flaps of the ears may be pressed without inserting the fingers.

If the position of nadanusandhana has been assumed, plug the ears with the thumbs, resting the other four fingers on the head.

Bring the awareness to the centre of the head, where ajna chakra is located, and keep the body absolutely still.

Stage 3: Breathe Awareness

Breathe in through the nose. Exhale slowly and in a controlled manner while making a deep, steady humming sound like that of the black bee.

The humming sound should be smooth, even and continuous for the duration of the exhalation.

The sound should be soft and mellow, making the front of the skull reverberate.

This is one round.

At the end of exhalation, breathe in deeply and repeat the process.

Perform 5 rounds.

AWARENESS:

Physical – on the humming sound within the head and on making the breath steady and even.
Spiritual – on ajna chakra.

DURATION:

5 to 10 rounds is sufficient in the beginning, then slowly increase to 10 to 15 minutes. In cases of extreme mental tension or anxiety, or when used to assist the healing process, practice for up to 30 minutes.

TIME OF PRACTICE:

The best time to practice is late at night or in the early morning as there are fewer external noises to interfere with internal perception. Practising at this time awakens psychic sensitivity. However, bhramari may be practiced at any time to relieve mental tension, providing the surroundings are peaceful.

CONTRA-INDICATIONS:

Bhramari should not be performed while lying down. People suffering from severe ear infections should not practice this pranayama until the infection has cleared up. Those with heart disease must practice without breath retention.

BENEFITS:

Bhramari relieves stress and cerebral tension, alleviating anger, anxiety and insomnia, and reducing blood pressure. It speeds up the healing of body tissue and may be practiced after operations. It strengthens and improves the voice and eliminates throat ailments.

ADVANCED PRACTICE:

Once the basic form of bhramari has been mastered, jalandhara and moola bandhas may be incorporated into the practice in conjunction with internal breath retention. Do not strain when performing kumbhaka, one or two seconds is sufficient at first. The duration may be increased gradually as the technique is mastered. When the head has returned to the upright position and the ears are plugged, slowly exhale producing the humming sound. As an alternative practice, only more strongly. In this way, a humming sound can be produced on inhalation as well as exhalation.

PRACTICE NOTE:

Bhramari pranayama induces a meditative state by harmonizing the mind and directing the awareness inwards. The vibrations of the sounds create a soothing effect on the mind and nervous system. It is also an important aspect of nada yoga which uses subtle sound vibrations to attune the practitioners with their true nature.

Note: The word bhramari means ‘bee’ and the practice is so called because a sound is produced which imitates that of the black bee.

Source: Asana Pranayama Mudra Bandha by Swami Satyananda Saraswati.


23 February, 2008

STEP BY STEP PRANAYAMA TECHNIQUES


NADI SHOODHANA PRANAYAMA


Hand Position: Nasagra Mudra (nose tip position)


Hold the fingers of the right hand in front of the face.

Rest the index and middle fingers gently on the eyebrow center. Both fingers should be relaxed.

The thumb is above the right nostril and the ring finger above the left. These two digits control the flow of breath in the nostrils by alternately pressing on one nostril, blocking the flow of breath, and then the other.

The little finger is comfortably folded. When practicing for longer periods, the elbow may be supported by the left hand although care is needed to prevent chest restriction.

Nadi Shodhana Pranayama (psyhic network purification)

Technique-1: Preparatory Practice


Sit in any comfortable meditation posture, preferably siddha / siddha yoni asana or padmasana. (Those who cannot sit in a meditation posture may sit against a wall with the legs outstretched or in a chair which has a straight back).

Keep the head and spine upright.

Relax the whole body and close the eyes.

Practise yogic breathing for some time.

Adopt nasagra mudra with the right hand and place the left hand on the knee in chin or jnana mudra*.

Close the right nostril with the thumb.

Inhale and exhale through the left nostril 5 times.

The rate of inhalation/exhalation should be normal.

Be aware of each breath.

After 5 breaths release the pressure of the thumb on the right nostril and press the left nostril with the ring finger, blocking the flow of air.

Inhale and exhale through the right nostril 5 times, keeping the respiration rate normal.

Lower the hand and breathe 5 times through both nostrils together.

This is one round.

Practice 5 rounds or for 3 to 5 minutes, making sure that there is no sound as the air passes through the nostril.

After practicing for 15 days go on to technique 2.

Technique 2: Alternative nostril breathing


In this technique the duration of inhalation/exhalation is controlled.

Close the right nostril with the thumb and breathe in through the left nostril.

At the same time count mentally, “1. Om; 2. Om; 3. Om”, until the inhalation ends comfortably. This is the basic count.

Breathe deeply with yogic breathing. Do not strain.

Close the left nostril with the ring finger, release the pressure of the thumb on the right nostril and while breathing out through he right nostril, simultaneously count, “1.Om; 2. Om; 3. Om”. The time for inhalation and exhalation should be equal.

Next, inhale through the right nostril, keeping the same count in the same manner.

At the end of inhalation close the right nostril, open the left nostril and exhale through the nostril, coming as before.

This is one round.

Practice 10 rounds.


Ratio and Timing:


After a few days, if there is no difficulty, increase the length of inhalation / exhalation by one count. Continue in this way, increasing the inahaltion / exhalation by one count as sit becomes easy, until the count of 12:12 is reached.

Do not force the breath in any way and be careful not to speed up the counting during the exhalation to compensate for shortage of breath. At the slightest sign of discomfort reduce the count.

After perfecting the above ratio, it may be changed to 1:2. For example, breathe in for a count of 5 and breathe out for a count of 10. Continue extending the breath by adding one count to the inhalation and two to the exhalation, up to the count of 12:24. This ratio establishes a calming rhythm for the brain and heart, assisting the treatment of cardiovascular and nervous system disorders specifically, and stress related conditions generally.

     When this technique can be performed with complete ease move on to technique. 3


Technique 3: with Antar Kumbhaka (inner retention)


       In this technique antar kumbhaka or internal breath retention is introduced.

       Inhale through the left nostril for a count of 5, close both nostrils and retain the air in the lungs for a count of 5.

       The glottis may be slightly contracted to hold the air in the lungs.

       Open the right nostril, inhale slightly and then exhale for a count of 5.

       Inhale through the right nostril for a count of 5 and retain the breath for a count of 5 with both nostrils closed.

       Open the left nostril, inhale slightly and then exhale for a count of 5.

       This is one round.

       Practise 10 rounds.

Ratio and Timing:


       The maintenance of a strict ratio during inhalation, kumbhaka and exhalation is of the utmost importance.  The ratio will change as the ability to hold the breath for longer periods of time develops.  After mastering the ratio of 1:1:1, increase the ratio to 1:1:2.

         For example, inhale for a count of 5, perform internal kumbhaka for a count of 5 and exhale for a count of 10.  After some weeks of practice, when this ratio has been mastered, increase the ratio to 1:2:2.  Inhale for a count of 5, do internal kumbhaka for a count of 10 and exhale for a count of 10.

       After mastering this ratio, gradually increase the count by adding one unit to the inhalation, 2 units to the retention and 2 units to the exhalation.  The count of one round will be 6:12:12.  When this has been perfected and there is no discomfort, increase the count to 7:14:14.  Gradually increase the count over a period of one or two years to 24:48:48.  Therefore, gradually increase the ratio to 1:3:2, and then 1:4:2.

*Explanatory Notes on
Jnana Mudra (psychic gesture of knowledge)


Assume a comfortable meditation posture.
Fold the index fingers so that they touch the inside root of the thumbs. Straighten the other three fingers of each hand so that they are relaxed and slightly apart. Place the hands on the knees with the palms facing down.
Relax the hands and arms.


Chin Mudra (Psyhic gesture of consciousness)

Chin mudra is performed in the same way as jnana mudra except that the palms of both hands face upwards, with the backs of the hands resting on the knees. Relax, the hands and arms.

Sequence: 

One of these two mudras should be adopted whenever practicing meditation / pranayama techniques.


Benefits: 

Janana mudra and chin mudra are simple but important psycho-neural finger locks which make meditation asanas more powerful. The palms and fingers of the hands have any nerve root endings which constantly emit energy. When the finger touches the thumb, a circuit is produced which allows the energy that would normally dissipate into the environment to travel back into the body and up to the brain.

When the fingers and hands are placed on the knees, the knees are sensitized, creating another pranic circuit that maintains and redirects prana within the body. In addition, placing the hands on the knees stimulates a nadi which runs from the knees, up the inside of the thighs and into the perineum. This nadi is known as gupta or the hidden nadi. Sensitising this channel helps stimulate the energies at mooladhara chakra.

When the palms face upward in chin mudra, the chest area is opened up. The practitioner may experience this as a sense of lightness and receptivity which is absent in the practice of jana mudra.

Variation: 

Jana and Chin mudras are often performed with the tip of the thumb and index fingers touching and forming a circle. Beginners may find this variation less secure for prolonged periods of meditation as the thumb and index finger tend to separate more easily when body awareness is lost. Otherwise, this variation is as effective as the basic position.

Practice note: 

The effect of chin or jana mudra is very subtle and it requires sensitivity on the part of the practitioner to perceive the change in consciousness established. With practice, however, the mind becomes conditioned to the mudra and when it is adopted the signal to enter a meditative state is transmitted.

Note:

The word jana means “wisdom” or “knowledge”, thus jana mudra is the gesture of intuitive knowledge. Chin on the other hand, is derived from the word chit or chitta which means “consciousness”. Chin mudra, therefore, is the psychic gesture of consciousness.

Symbolically, the small, ring and middle fingers represents the three gunas or qualities of nature; tamas - inertia; rajas – activity and creativity and sattwa , luminosity. In order for consciousness to pass from ignorance to knowledge these three states must be transcended. The index finger represents individual consciousness, the jivatma, while the thumb symbolizes supreme consciousness. In jana and chin mudras the individual (index finger) is bowing down to the supreme consciousness (the thumb), acknowledging its unsurpassed power. The index finger, however, is touching the thumb, symbolizing the ultimate unity of the two experiences and the culmination of yoga.
~~~~~~~~~~~~~~~~~~~~~~~~~~~~~~~~~~~~~~~~~~~~~~~~
Source: Asana Panayama Mudra Bandha
By Swami Satyananda Saraswati of Bihar School of Yoga.

~~~~~~~~~~~~~~~~~~~~~~~~~~~~~~~~~~~~~~~~~~~~~~~~~

27 December, 2007

PRANAYAMA

(Swamy Rama Tirtha 1873-1906)
Pranayama literally means "control of breath". The Hindu books on yoga gives eight principal methods of controlling the breath. But Rama will lay before you only one method known as Pranayama, a very important method of controlling the breath. This is a kind of physical exercise. Those who think that this Pranayama has got something mystical, some divine meaning in it, are mistaken. Those who think that the highest Realization culminates in it and that there is nothing higher than it, are mistaken. Pranayama or this control of breath has nothing supernatural in it. It is an ordinary exercise. Just as you go out and take physical exercise, so is this, a kind of exercise of the lungs. There is no real significance in it, nothing mystic about it.

BENEFITS OF PRANAYAMA

It will cure you of many physical diseases. Most of your diseases leave you; consumption, diseases of the stomach, blood diseases, and almost every diseases will leave you if you practise that. We will now see what is that.

METHODS OF PRACTICE

In order to practise Pranayama you must sit in a most comfortable, easy position to sit cross-legged is the most comfortable posture, but this posture will kill you, a West Indian. You may sit in an easy chair. Keep your body straight, back-bone stiff, head-up, chest out, eyes front. Place the right hand thumb on the right nostril, and inhale the breath slowly through the left nostril. Go on inhaling slowly, until you feel at ease, go on inhaling as long as you conveniently can. While inhaling, let not the mind be vacant. While you are inhaling, let the mind be concentrated on the thought that all omnipotent, omniscient, omnipresent divinity is being inhaled, that you are drinking divinity, the Godhead, the whole world, the whole universe. Well, when you think you have filled in the air to your best, then close the left nostril, through which you were inhaling, by finger; thus when you stop both strips, let not the breath escape through the mouth; keep the inhaled breath within you in the lungs, in the stomach; in the abdomen; all the activities being filled with air, the air which you have inhaled, and when the breathed air is in you, let not the mind be vacant, let the mind be centered in the idea, in the truth that you are divinity, the Almighty god that fills, permeates and pervades everything, every atom and molecule in the universe

PRECAUTION

Be natural in every part of this breathing process. Make efforts, do your best to lengthen every process, but do not fatigue yourself. Do not work much yourself. If after performing only the firs two processes, say, the inhalation and keeping the breath in your lungs, you feel tired, stop. Stop, you are under no obligation. The next day be more considerate, and while performing the first processes or the second process, try to keep your energies reserved, so that you may be able to continue the remaining processes; be judicious.

***
Source: In Woods of God-Realization Vol-II by Swamy Rama Tirtha (1873-1906)

***